Friday 4 May 2012

Evaluation


Overall I am pleased with the way my villain turned out despite the problems I had at the start with the cat objects used for the rigging stage. This forces me to start over again using the biped instead. My villain also quite closely matches my preliminary sketches with a few small changes due to time constraints such as the facial hair. I am particularly pleased with the face and the hook hand, which brings a sense of evil and danger to the character and also provides a little more back story. The face looks rather menacing with the shifty and slightly mismatched eyes to the jaw and mouth which looks to be locked in place. It also makes his teeth look too big for his mouth adding a little more grotesqueness to him. 

If I could change one thing about my character apart from adding a little facial hair it would probably be the hand. It doesn’t really feel quite right and due to problems with the cat objects I wasn’t able to add bones to it in the allotted time frame.

Final Video


Below is my final video of my animation:

Animating


Due to problems with the cat objects I wasn’t able to add bones to the fingers of the villain. Because of this my animation plans have changed slightly so that instead of gripping a broom handle at the start I will have him walking along a corridor to start with and pick up a bucket with his hook hand as he walks along.

Now that the scenes are ready I imported my villain into the scene and altered the footsteps making more of them but moving at a slower pace. I then placed the bucket in the path of the footsteps and using the link constraint so that when the villain approached it he would pick it up as he moved.

Firstly select the bucket handle and go to animations, constraints and link constraints. A dotted line will then appear then select the finger of the biped. Click on link to world so that for now the bucket is part of the world objects. Switch on the auto key and move the slider along until just before the biped reaches the bucket then select add link and choose the finger on the biped. Now when the biped reaches the bucket he will pick it up as he passes and carry it with him. Some minor adjustments need to be made so that the bucket handle looks like its attached to the hook hand.


Once the walking was sorted out with the appropriate speed I thought the villain should be walking at I moved on to the posture. My villain has quite a hunched back but with the default walking settings it makes the biped stand up straight and the biped loses part of the effect. Using auto key I can rotate the spine and shoulders forward a little to make the hunch stand out a little more.


Next is animating the eyes which are a little more difficult as it is a consistent animation with a regular pattern. To make it easier I am going to animate each eye once and then copy the key frames down the line so that the character blinks on a regular basis.


I then added another small animation with the right hand pushing the caretaker’s hat up a little further on his head. This was done using auto key and selecting and moving the arm up towards the head. Once the hand reached the hat the hat tilts backwards slightly exposing the eyes a little more to the scene.


The villain then keeps on walking until it approaches a trolley loaded with evidence outside the evidence locker. This then merges over to the next scene of animation. Here for a few seconds the camera will focus on the eyes of the villain as he shifty looks left and right checking to see if anyone else is around. This will be animated in the same way the eyes when they blink.


I then moved onto the animation sequence where the villain pushes the trolley of evidence away. I tried using the link constraint for this but unfortunately it moved around too much when attached to the hand. Instead I used the auto key technique and as the villain walked I moved the trolley in time with the footsteps occasionally moving the hand to make it look like he was touching the trolley as it moved.


The next stage of the animation involved the villain pushing the trolley of evidence through the door into the caretaker’s office. As the villain walks the eyes shift from side to side to make sure he’s not being watched as he walks away with a trolley of evidence. As he approaches the door to his office the door opens and he walks through and the door slides shut behind him. The camera then moves down to look at the bottom of the door preparing the final part of the animation.


The last part of the animation involves the camera looking down at the door moving slowly upwards towards the glass panel in the door where the villain pulls down a curtain preventing anyone from seeing what he is doing in his office. The hook hand appears the other side of the glass frame and pulls down a curtain.


Now that all of my scenes and animations have been created I can now render the separate files out. I have also chosen a track to play as the villain walks down the corridor; it is another one bites the dust by Queen. This track has been edited so that the starting beat loops a few times and then fades out towards the end of the animation.

Character Biography


While designing my villain I wrote up a back story for him to give him a more believable feel.


Name: Cyril Rhyme (C.Rhyme)

Alias: TJ – leaves a calling card at crimes he’s committed, police know the alias but don’t realise he’s the janitor

Age: 32

Appearance

·         Longish face

·         Long thin Bony fingers

·         Hook on left hand

·         Slightly curved nose

·         Sharp eyes, narrowed

·         Gap in teeth

·         Slightly hunched over broad shoulders

·         Thin legs

Parents: Dad – Respected Police Officer

Mom – Border Patrol Officer

Cyril’s History

·         Born in Devon, Moved to Norfolk at a young age due to father getting promoted in the police force

·         Went through school with only one dream, to becoming a police officer

·         Trained and studied hard to become a police officer

·         Failed the Health check-up test preventing him from joining the force at age 26 due to heavy asthma

·         After failing the test had an accident in the lift which resulted in his left hand being cut off, police covered up incidence dodging responsibility. This caused him to feel betrayed by the police after idolising everything they stand for.

·         Spent 2 years roaming around the country bitterly plotting revenge. His appearance changed becoming thinner in the face.

·         Developed Lock jaw due to gritting his teeth so much in anger. Cannot open and close his mouth very far but can still talk in a slightly muffled voice.

·         Discovered he had a talent at trickery, deceit and bribery. 

·         At age 28 Applied to become a janitor at a nearby establishment waiting for an opening at the police station.

·         Got together and created a variety of surveillance and spy equipment practising on the current establishment

·         At age 31 grabbed the opportunity to work as a janitor on the police force

·         Spent the next year creating a secret underground lair with the entrance located within the janitor’s closet. There are multiple other entrances for his minions/servants to come to him

·         Spends his time around the police station picking up new information, potential new recruits, leads on current crimes being committed, able to cover up some of his own plots by tampering with evidence, planting bugs around the police station for complete surveillance, making life as difficult as possible for the police force as he gradually brings them down from the inside.


Favourite Foods

·         Soup

·         Spaghetti

·         Haribo sweets

Hates

·         Doughnuts – because it’s a policeman’s favourite food

Thursday 26 April 2012

Rigging


The next stage of the character creation is to add bones to the character. To start make the character see-through so you can see where to place the bones then  go to helpers and select catobjects then select catparent. Resize the parent object so that it fits the character and then add a pelvis to it. Resize the pelvis so that it just fits the character and then select the add spine option, placing it in rough alignment with the shoulders.


Next add the arms placing them just inside the mesh of the arms so the bones fit comfortably. Some of the bones may need to be resized in order to fit.


Next select the pelvis again and add some legs placing them within the mesh.


Move back and select the top spine again, the one that is level with the shoulders and add another spine and place it within the head.


Click on the hand and add another bone, then place it in the mesh within the finger. Do this for all of the fingers to make up all of the joints.


Adding skin


Once all of the bones have been added select the mesh and add the physique modifier. Add all of the bones to the modifier which will attach the mesh to the bones. In the drop down list from the physique modifier select the envelope option and using the child and parent overlap options smooth out the connection between bones and mesh.


Changes


Due to problems with the catobjects to make the bones I had to scrap the bones and do it again with the biped instead. Each part of the biped needed to be resized and moved around so that it fitted comfortably inside the mesh. Once all the bones were the right size I had to select the pelvis and initialize the bones to the mesh. I could then select the envelope feature in the physique modifier and smooth out the skin around the bones. To check if the bones were attached to the skin comfortably I selected the biped and added some footsteps so I could watch my villain walk with the skin. This allowed me to see where the skin needed a little more smoothing.

Villain Scene Layout


I then moved on to create a quick setting for my character where all of the animation will be held. I used a box to create a floor and another box to create the walls. I converted the wall boxes to and editable poly and deleted a few of the segments to create holes for the doors in the walls. I then used another box to create a basic door and assigned a colour and glass texture to it then placed it in all of the door spaces. I then assigned some other colours to the floor and the walls.


I then created an editable poly box and applied various techniques to create a layered trolley, then placed various sized boxes on it. Next I created a bucket for my character to carry which would swing from the arm with the hook. This was created using two cylinders, one of which has the bend modifier to form a handle.


I then placed in some labels to go on the trolley and the wall near the doors to aid the viewer. Next I saved it and merged the villain animation scene with the character putting them in the same file. I made a few adjustments to the size of the scene layout so that the character fitted with the scene.

Wednesday 29 February 2012

Character Creation

Torso

To start off the creation of my villain I have decided to follow the same method as when I created the basic character. First create a box and allocate each section with segments, then convert it to an editable poly. Next extrude out a place for the arms and neck by selecting the necessary polygons.

Next using the cut tool, add some more lines around the body. Select vertex mode and move the vertices around where the back of the villain will be to create a hunch. Move the vertices inwards a little at the side of the body to create the waist of the villain.

After pulling out some of the vertices around the shoulders, push some of the vertices inwards around the lower back to show off the hunch. Select the vertices at the bottom and pull them up a little to create the pelvis, then extrude out the polygons where the legs will go. Extrude out the neck a little more and the select the line at the back of the neck. Move this line up to tilt the neck forwards slightly to aid the hunched look. Use the scale tool on the polygon extruded from the top of the neck to make the polygon a little smaller. Add a turbo Smooth effect to see what the current torso of the villain looks like.

Arms and legs

The arms and legs are very simple to create. First select polygon mode and select both faces on the arms, scale them down a little to make them more round. With both faces still selected extrude them out a little to form the bicep of the arm. Select the bevel tool to create the elbow, then move back to the extrude tool to create the forearm.

Once the arms are long enough move down and select the polygons on the legs. Extrude the legs out a little to create the thighs and then switch to the bevel tool to create the kneecap.  Move back to the extrude tool for the remainder of the leg. Change the colour of the character to a more skin like colour.

Turn off the turbo smooth so that the edges can be seen more clearly and select the lines where the elbows are. Move them out a little so that when it is turbo smoothed again it will create a bump on the elbow. This can then be applied to the kneecaps as well.

Clothing

Apply the turbo smooth again and clone it. Scale the clone making it a little bigger and delete most of the polygons on the arms and legs. Move the lines around a little so that the bigger shape completely covers the smaller one so that it looks like the body is now wearing a vest.

Next move the vertices of the vest around so that it is just covering the body of the character and delete the polygon around where the neck is. Next extrude the head out from the body shape to form a long narrow head and extrude out the lower polygon from the head to create a chin. Select the lines and move them around to separate the chin and the head out a little more, making them much easier to distinguish.

Once again turn turbo smooth off and cut a new set of vertices straight down the middle of the vest. Click on the vertices and use the chamfer tool to split the vertices creating a small square and work the way down the vest doing this for all of the vertices in the centre. Assign an ID number to both the vest and the buttons and add appropriate materials to it using the material editor. Once done turbo smooth it again.

Back positioning

Once I got the basic body shape for my villain I then moved on to fine tuning a few details, starting with the back. Though I got the hunch the way I wanted the top of the shoulders seemed to stick out too much making them look rather large. First select the body shape and select the vertices and just move each of them back to make the back a little more rounded off, rather than pointy. Do the same for the shirt so that the shirt just covers the body.

Hand

First use the cut tool to break up the segment into a few multiple segments. Extrude each of these segments in turn switching to the bevel tool to round off the end of the fingers. Use the cut tool again to cut up a segment on the side of the hand and extrude the thumb. Move the vertices around a little to make the thumb more rounded.

Hook Hand

While modelling the hand I thought it would be a good idea to have the other hand as a hook to make the villain a little more threatening. Simply extrude out the segment a little then use the scale tool to scale down the size of the segment being extruded. Switch to the bevel tool to round of the end of the hook, and then move the vertices around until the hook is curved.

Attaching clothing to body

Attaching the clothing to the body using the attach tool will make the whole object the same colour. Select each individual bit of the body, such as arms, legs and head and assign an ID number to it. Do the same for the hook, feet and shirt and then choose the different colours for the different attributes.

Eyes, Nose and Mouth

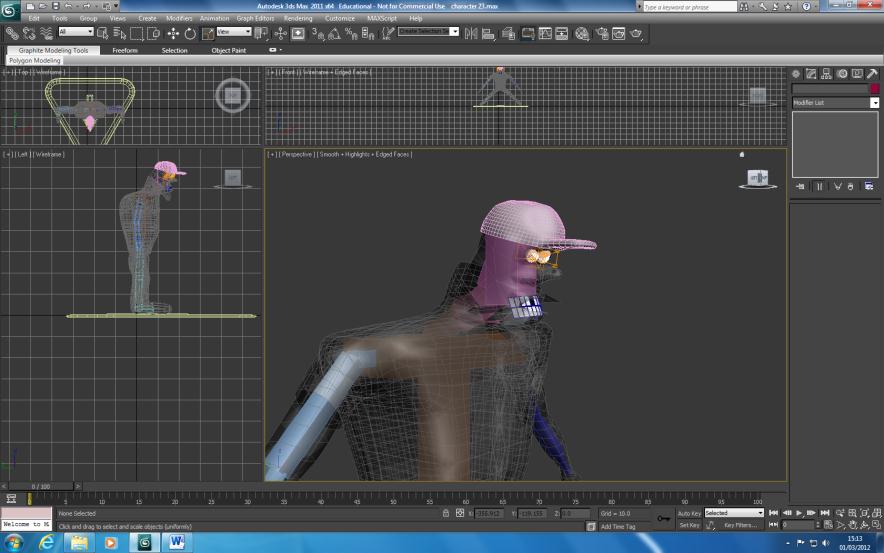
For the eyes I followed the simple tutorial as previously shown. I then moved the points around on each eye and scaled them to fit the face. I decided upon making the eyes look a little different to add to the ugly side of the villain’s personality. I also cut the segment where the eyes are located into two, then bevelled them both in a little to create an eye socket of a sorts.

The nose was also fairly simple. First cut out a triangle in the segment underneath the eyes and then extrude the newly cut segment. Next move the vertices making the nose narrower on the top and a little narrower on the bottom.

For the mouth I used the connect tool on the segment underneath the nose creating a new segment a little way apart from the nose. I then used the inset tool to create an outer line around the new segment and the used the extrude tool to push the segment in a little. I then created a box and used the connect tool to create multiple lines down the box. I then used the inset tool to give each small box an outer edge and then assigned new ID numbers for both the larger and smaller faces. The larger faces I then gave a white colouring and the smaller one a black colour. I then placed this box in the space I created for the mouth and then moved the vertices around on the head to hide parts of the teeth.

Hat

Next I decided to give the villain a hat, by first cutting a cylinder in half and extruding out a few of the faces a little. I then used the soft selection tool to pull about some of the vertices making the hat look a little worn in places.

Clothing

I decided to keep the short sleeves in tack for the shirt, for the legs I selected the lines from trousers and used the loop tool to select all of the lines around the leg. I then used the shift copy method to move down the trousers down the leg.

I decided to then go back and work on the mouth as it didn’t look quite right. I deleted all of the segments on the face around the mouth area and used the shift copy method to create a new blank one. I used the connect tool to break the bigger segment up into smaller ones so they can be more easily moved. I extruded the middle ones inwards a little and moved the outer ones around a little. I used the bend modifier on the teeth I created earlier so that the teeth became more rounded and fit comfortably in the slot in the mouth. I then moved the vertices around so that parts of the teeth were covered by the lip area and also so you can see some of the teeth when viewing the villain from the side.